EDK2 payload in Libreboot, plus Chromebooks.
This page also contains general guidance about EDK2 on all boards that use it, which is nearly all boards; many non-Chromebooks have EDK2 now as the default payload, in Libreboot.
This document applies to x86-64 Chromebooks. ARM64 Chromebooks are covered by chromebooks.
Libreboot uses EDK2 on x86 Chromebooks, and U-Boot on ARM64. This page is for the EDK2 version on x86-64.
Open source BIOS/UEFI firmware
This document will teach you how to install Libreboot, on various Intel/AMD Chromebook laptops. Libreboot replaces proprietary BIOS/UEFI firmware, though it should be noted that Google already ships coreboot and their own payload called Depthcharge, which is all free software; the difference with Libreboot is that it replaces Depthcharge with EDK2 (as a coreboot payload), which provides a full UEFI boot implementation that can boot regular Linux and BSD systems more easily than Depthcharge. It can also boot Windows.
We provide this as the default payload since Libreboot 26.10 Ominous Olive, on nearly all x86-64 mainboards; this applies also to non-Chromebook mainboards, which are also covered by this page ostensibly written about Chromebooks.
We specifically use the MrChromebox version of EDK2, and on Chromebooks we also use MrChromebox coreboot instead of regular coreboot. You are strongly advised to read MrChromebox documentation in addition to Libreboot, as Libreboot does not currently integrate any of its tooling; it only has MrChromebox coreboot and EDK2. This is to say: if using Libreboot on a Chromebook, you should refer to MrChromebox documentation for information about installation and updates. Libreboot tries to maintain sync with MrChromebox in such a way that the ROM images are interchangeable.
We modify MrChromebooks in the following ways:
- Added EFI GRUB build in PE32 section
- Added EFI SeaBIOS CSM (CSMWrap) in PE32 section
- Added Memtest86+ in PE32 section.
- Enabled iPXE by default on non-Chromebooks.
This page attempts to give a brief, general overview of how to flash custom firmware on ChromeOS devices. This guide usually refers to all of them as “Chromebook”s since it’s the most common form factor.
Non-chromebooks are also covered for installation. These will be covered first.
General EDK2 guidance
This applies to all boards, not just Chromebooks. Some tips:
We use SMMSTORE by default. You can use this option in flashprog when updating the ROM:
--fmap -i COREBOOTUse these options in flashprog, to flash just the COREBOOT section. This avoids overwriting SMMSTORE which contains settings, otherwise you will restore your settings to default when updating.
GRUB and SeaBIOS in PE32 work like the old coreboot payloads; old Libreboot setups can be adapted easily. Our setup is made to be backward-compatible.
NOW, the rest of this page pertains specifically to Chromebooks:
Flashrom
A special fork of flashrom, maintained by Google, is required for flashing these Chromebook devices. See:
https://chromium.googlesource.com/chromiumos/third_party/flashrom/
This document assumes you’ll be using ChromeOS to do the internal flashing. ChromeOS already comes with this special fork of flashrom pre-installed. But if you are using another OS or an external flasher, you will need to compile and use the aforementioned flashrom fork.
NOTE: Upstream flashrom also supports this. Specifically: --disable-wp is needed for disabling write protection once clearing the WP pin. Flashprog will need to have this feature added, and then this section can remove flashrom from its recommendation.
Enable ChromeOS “Developer Mode”
Chromebooks are locked-down by default to only run ChromeOS. Most things you will want to do on these require you unlock it by enabling their Developer Mode. On most devices, you would press the Escape + Refresh + Power key combination to restart into the Recovery Mode, then press Ctrl + D and finally confirm enabling Developer Mode with Enter.
On your next boot, it will show you an “OS Verification is disabled” screen. Waiting for 30 seconds or pressing Ctrl + D on this screen will proceed to boot into ChromeOS, which then erases all data on the device and reboots again into a clean ChromeOS installation.
Before following steps to configure your device as new in the first screen, you should be able to see a “Enable debugging features” link that you should click on. A confirmation dialog displays. Click Proceed. The system reboots, use Ctrl + D again and displays a dialog with password prompts. Set the new root password. Click Enable. The screen displays messages indicating success or failure. Click OK. You’ll see the first screen again. Follow the remaining prompts to configure your Chrome device.
Once you are finished configuring your device, you’ll be giving the option to sign in; here you may use the guest account option in the bottom if you like.
Now in the desktop we’ll set a password to use “sudo”: Use Ctrl+Alt+Forward Arrow (the one two key to the right of esc key, representing F2) to open a “Developer console” (similar to opening a tty) where the first line ends with “localhost login”. Enter root and the password you just set for it. Then you must run chromeos-setdevpassword and set another password, which is the one that is actually used when running “sudo”. Now use Ctrl+Alt+Backward Arrow (the key next to the right of esc, representing F1) to get back to the desktop.
With Developer Mode enabled, you can launch a terminal emulator inside ChromeOS by pressing the Ctrl + Alt + T key combination. Run shell inside the resulting crosh prompt to actually get to a bash session where you can run programs. Most of the root file system is read-only, except for /usr/local and any mounted drives under /media/removable.
Identify your device
It’s more common to refer to ChromeOS boards by their codenames, and many compatible devices can share a single codename. Libreboot ROM images also use these, you should only use the one corresponding to your device’s. There are a number of ways to find it, some are:
- Check the “Model” on the Recovery Mode or Developer Mode screens
- Visit
chrome://versionin ChromeOS and check the “Firmware Version” - Run
crossystem hwidorcrossystem fwidin a terminal
Back up stock firmware
The stock firmware on your device comes with some irreplaceable data that is unique to your device. This can include the serial number and hardware ID of the device, network MAC address, HDCP keys, maybe more. The stock firmware is also the only one that will properly boot and run ChromeOS.
Make sure you back up the original firmware before trying to replace it. The version of flashrom in ChromeOS understands host as a programmer to flash firmware internally. To back up stock firmware you can run:
sudo flashrom -p host -r depthcharge.rom
sudo flashrom -p host -v depthcharge.rom
Keep the resulting depthcharge.rom file safe and properly backed up on another device.
If you can already boot a conventional Linux distro on your Chromebook, you may be able to use flashrom -p linux_mtd on that system instead.
NOTE: MrChromebox flash scripts can be used with Libreboot images. These scripts intentionally preserve the RO_VPD region containing MAC address and serial number.
Further note: in my testing, it looks like most Intel chromebooks don’t use Intel gigabit ethernet NICs, so use of nvmutil is largely useless on these boards.
Check external flashability
If a ROM image you flash is broken, you may need to restore the stock firmware to fix the board to get internal flashing working. Refer to the external flashing guide, and check that the result of flashrom -r matches what you get when you run it from the device. Chromebooks may have 1.8V as the supply voltage for the SPI NOR chip, be extra careful about that.
On newer Chromebooks, there is a root-of-trust chip providing a Closed Case Debugging mechanism that lets you flash externally using a special USB debugging cable. However, most boards that Libreboot supports do not have this.
Disable write protection
Chromebooks have the SPI flash chip partially write-protected by default, but thankfully this protection can be disabled by the device owner. How to do so depends on the board, refer to the ChromiumOS documentation on Write Protection for more info. You will usually need to do this only once for the board’s lifetime, unless you manually enable it again.
On most boards that Libreboot supports, write-protection is enforced by a physical screw. When screwed in, it forms an electrical connection that asserts the WP pin on the flash chip. The screw can be identified by the fact that it bridges electrical contacts, but finding and removing it might require you to disassemble most of the board.
In my case as an example, my kevin board had the protection screw here. It was tricky for me to find it since it was one of the screws that seemed to hold the heat sink in place, which I thought made it an unlikely candidate. I recommend you leave it unscrew never the less after flashing.
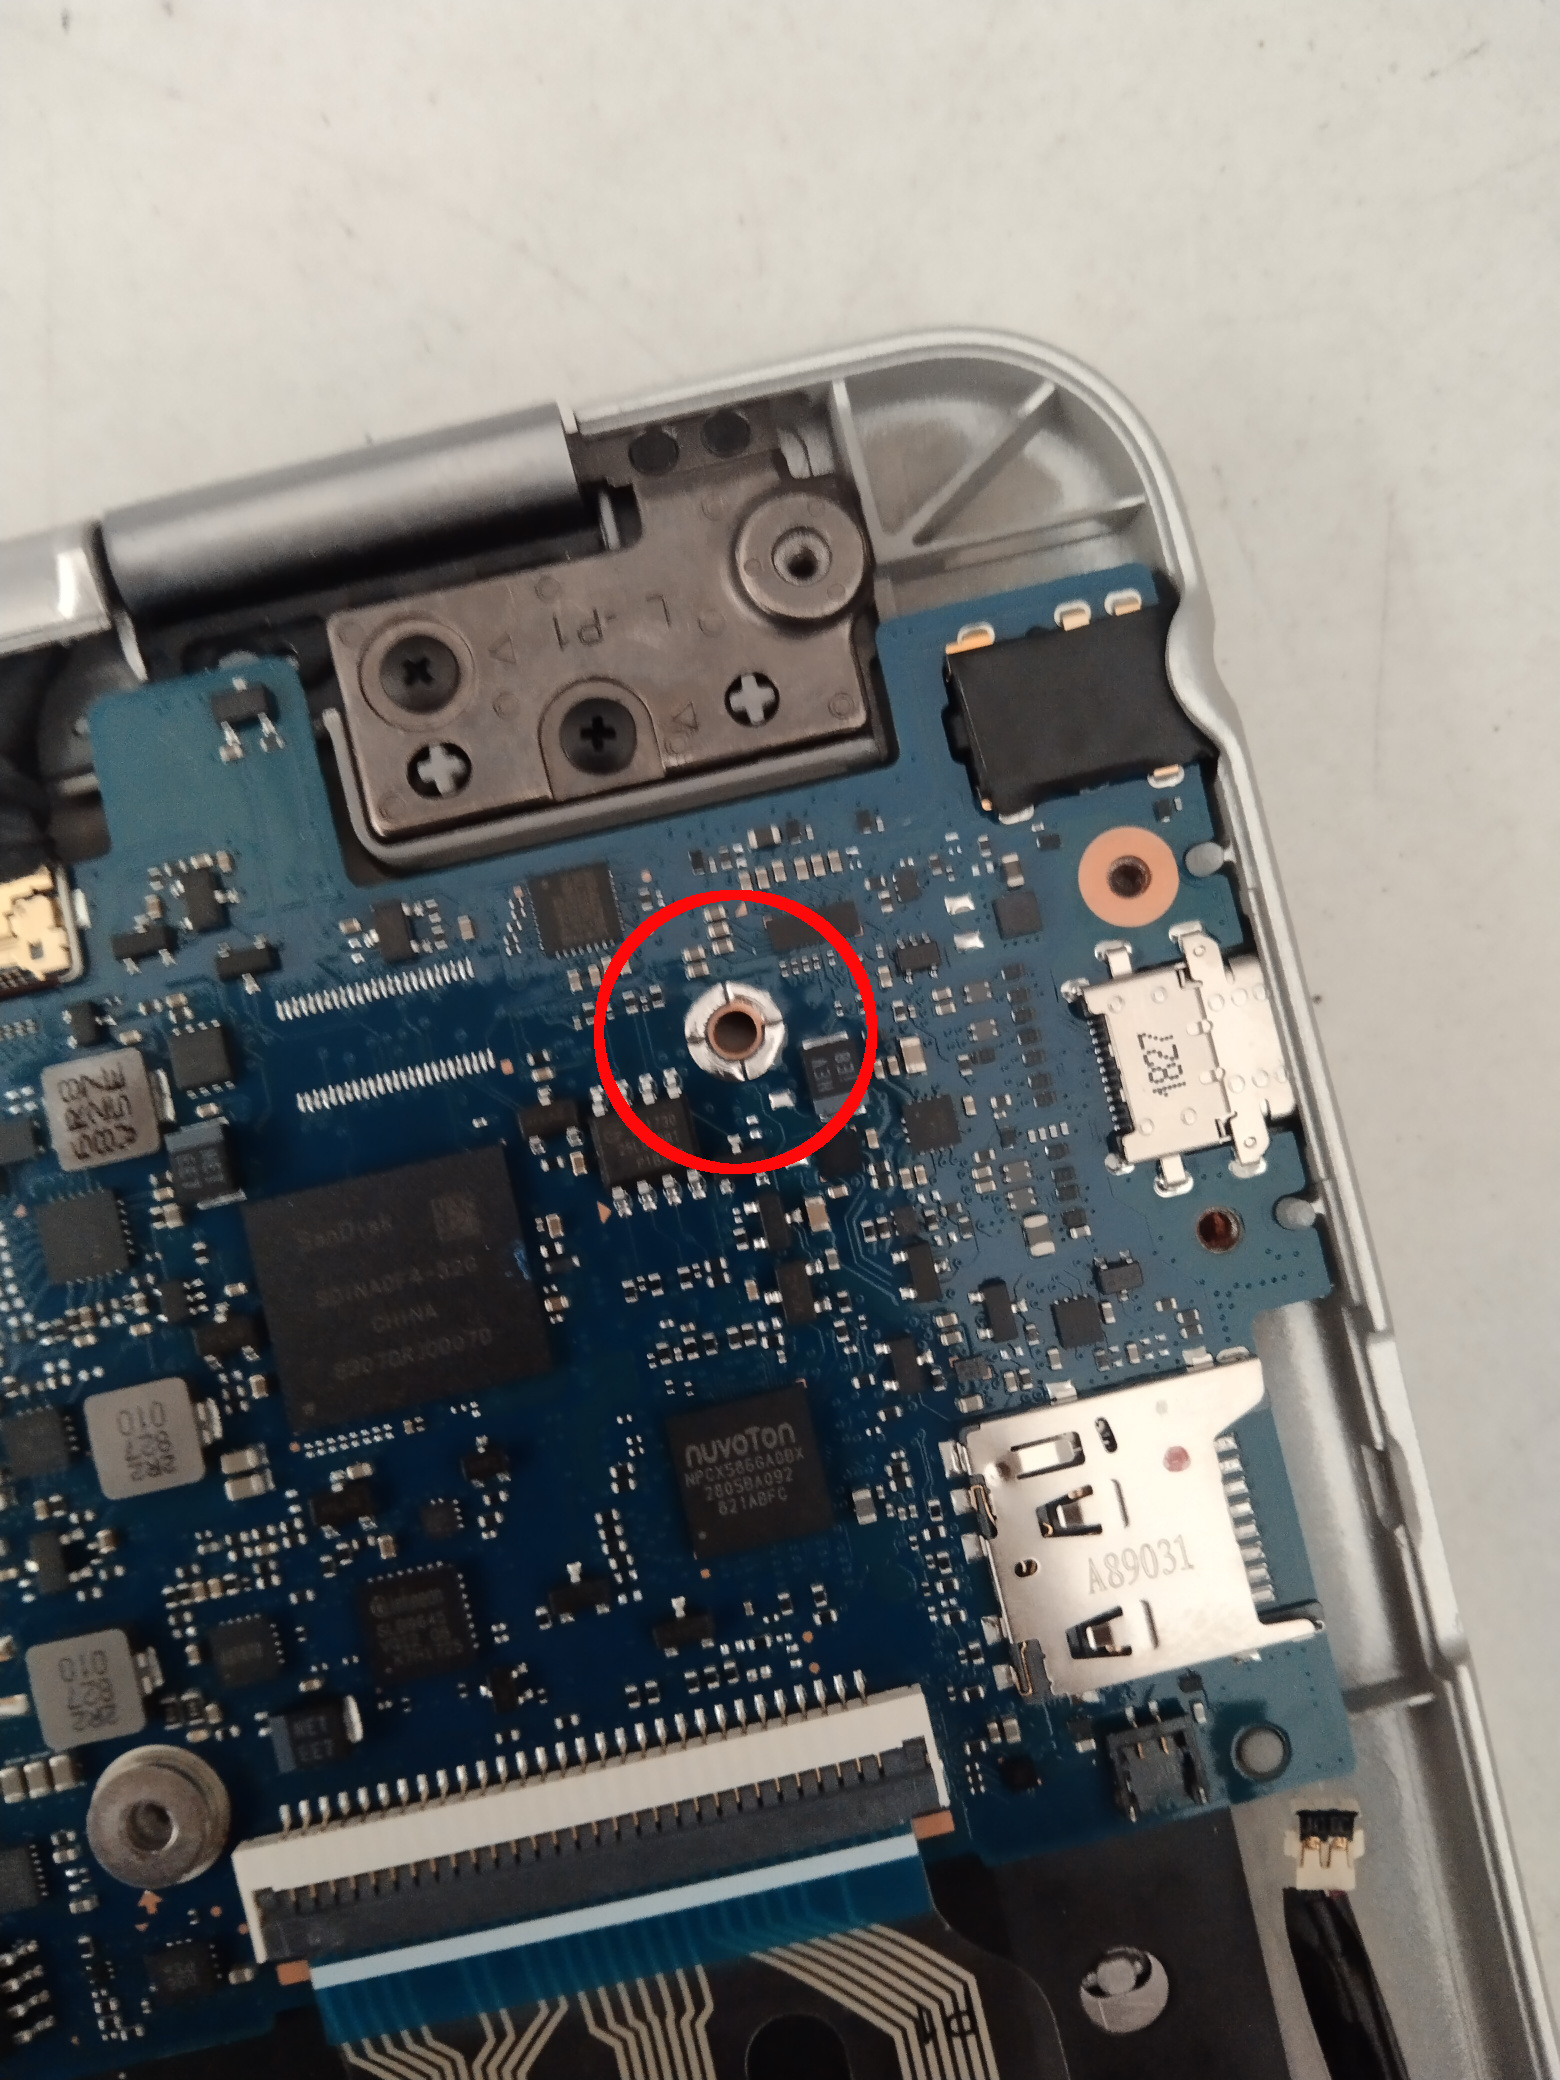
Newer boards have a root-of-trust chip enforcing write-protection. The Closed Case Debugging mechanism should be used to disable hardware write-protection. Opening the case and disconnecting the battery might also disable it.
Disabling the write-protect signal doesn’t directly make the chip stop protecting its data, it just allows you to disable its write-protection in software. That also needs to be done in ChromeOS afterwards:
sudo flashrom -p host --wp-status
sudo flashrom -p host --wp-disable
sudo flashrom -p host --wp-range 0x0,0x0
The –wp arguments are only available on the ChromiumOS fork of flashrom. If you are using another OS or an external flasher, you may need to compile and use that flashrom fork to disable write-protection. There is no lbmk support yet for automatically building it.
Have a look at MrChromebox’s write protect notes linked at the bottom of this page, which has some useful guidance, also see the next sections.
Prepare the ROM image
Libreboot ROM image layouts are currently incompatible with the regions that should be carried over from the stock firmware. However, the released images should still be somewhat usable, since the Chromebooks supported so far don’t require any non-redistributable code to be injected by the end user.
Future Libreboot versions will likely require post-processing to preserve irreplaceable data in the firmware image. For now, make sure to keep backups of the original firmware.
TODO: Instructions to preserve vital data when FMAPs are compatible.
Flash the ROM image
You can flash the ROM image both internally and externally. For the latter, see the external flashing guide and the ChromiumOS Closed Case Debugging documentation if your board supports it.
To flash the entire ROM image internally, run within ChromeOS:
sudo flashrom -p host -w libreboot.rom
sudo flashrom -p host -v libreboot.rom
If you can already boot a conventional Linux distro on your Chromebook, you may be able to use flashrom -p linux_mtd on that system instead.
Install an operating system
EDK2 is UEFI-based. It will work perfectly with any UEFI-based operating system you throw at it.
Linux and BSD will pretty much just work, but may have some quirks; check MrChromebox documentation about this.
Windows can be used, and drivers may be found here: https://coolstar.org/chromebook/windows.html
We discourage the use of Windows, but this link is provided for completeness.
See also
- ChromiumOS Documentation
- ChromiumOS Firmware Test Manual
- ChromiumOS Flashrom Fork Information
- MrChromebox’s Unbricking Guide
- MrChromebox’s Write-Protection Notes
- Coreboot Tutorial as used in ChromeOS
List of Chromebooks supported
In Libreboot 26.10 Ominous Olive from 15 October 2026:
- Google Anahera
- Google Aurash
- Google Banshee
- Google Bujia
- Google Caboc
- Google Constitution
- Google Crota
- Google Dochi
- Google Felwinter
- Google Gaelin
- Google Gimble
- Google Gladios
- Google Jubilant
- Google Kano
- Google Kinox
- Google Kuldax
- Google Lisbon
- Google Lotso
- Google Marasov
- Google Mithrax
- Google Moli
- Google Moxie
- Google Anraggar
- Google Craaskov
- Google Craask
- Google Dirks
- Google Domika
- Google Epic
- Google Glassway
- Google Gothrax
- Google Guren
- Google Joxer
- Google Kaladin
- Google Meliks
- Google Nereid
- Google Nivviks
- Google Nova
- Google Pujjocento
- Google Pujjogatwin
- Google Pujjoga
- Google Pujjolo
- Google Pujjoniru
- Google Pujjo
- Google Quandiso2
- Google Quandiso
- Google Riven
- Google Rull
- Google Sundance
- Google Teliks
- Google Telith
- Google Tereid
- Google Tivviks
- Google Uldrenite
- Google Uldren
- Google Xivu
- Google Yaviks
- Google Yavilla
- Google Omnigul
- Google Osiris
- Google Primus
- Google Redrix4ES
- Google Redrix
- Google Taeko
- Google Taniks
- Google Vell
- Google Volmar
- Google Xol
- Google Coral
- Google Pyro
- Google Reef
- Google Sand
- Google Snappy
- Google Auron_Paine
- Google Auron_Yuna
- Google Buddy
- Google Gandof
- Google Guado
- Purism Librem 13 v1
- Purism Librem 15 v2
- Google Lulu
- Google Rikku
- Google Samus
- Google Tidus
- Google Banon
- Google Celes
- Google Cyan
- Google Edgar
- Google Kefka
- Google Reks
- Google Relm
- Google Setzer
- Google Terra
- Google Ultima
- Google Wizpig
- Google Banjo
- Google Candy
- Google Clapper
- Google Enguarde
- Google Expresso
- Google Glimmer
- Google Gnawty
- Google Heli
- Google Kip
- Google Ninja
- Google Orco
- Google Quawks
- Google Squawks
- Google Sumo
- Google Swanky
- Google Winky
- Google Akemi
- Google Ambassador
- Google Dooly
- Google Drallion
- Google Dratini
- Google Duffy
- Google Faffy
- Google Genesis
- Google Helios
- Google Jinlon
- Google Kaisa
- Google Kindred
- Google Kohaku
- Purism Librem 14
- Purism Librem Mini v2
- Google Moonbuggy
- Google Nightfury
- Google Noibat
- Google Scout
- Google Wyvern
- Google Dewatt
- Google Nipperkin
- Google Ampton
- Google Bloog
- Google Bobba
- Google Casta
- Google Dood
- Google Fleex
- Google Foob
- Google Garg
- Google Lick
- Google Meep
- Google Phaser
- Google Falco
- Google Leon
- Google Mccloud
- Google Monroe
- Google Panther
- Google Peppy
- Google Tricky
- Google Wolf
- Google Zako
- Google Awasuki
- Google Beadrix
- Google Blipper
- Google Boten
- Google Boxy
- Google Bugzzy
- Google Cret
- Google Dexi
- Google Dibbi
- Google Dita
- Google Drawcia
- Google Galtic
- Google Kracko
- Google Lantis
- Google Madoo
- Google Magolor
- Google Metaknight
- Google Pirika
- Google Sasukette
- Google Sasuke
- Google Storo
- Google Taranza
- Google Atlas
- Google Endeavour
- Google Eve
- Google Fizz
- Google Karma
- Purism Librem 13 v4
- Purism Librem 15 v4
- Google Nami
- Google Nautilus
- Google Nocturne
- Google Rammus
- Google Soraka
- Google Crystaldrift
- Google Frostflow
- Google Markarth
- Google Skyrim
- Google Winterhold
- Google Kanix
- Google Karis
- Google Screebo
- Google Berknip
- Google Dirinboz
- Google Ezkinil
- Google Gumboz
- Google Morphius
- Google Shuboz
- Google Vilboz
- Google Woomax
- Google Asuka
- Google Caroline
- Google Cave
- Google Chell
- Google Lars
- Purism Librem 13 v2
- Purism Librem 15 v3
- Google Sentry
- Google Butterfly
- Google Link
- SAMSUNG Lumpy
- Google Parrot
- Google Stout
- SAMSUNG Stumpy
- Google Aleena
- Google Careena
- Google Liara
- Google Treeya
- Google Chronicler
- Google Collis
- Google Copano
- Google Delbin
- Google Drobit
- Google Eldrid
- Google Elemi
- Google Lindar
- Google Voema
- Google Volet
- Google Voxel
- Purism Librem Mini
- Google Sarien
Markdown file for this page: https://libreboot.org/docs/install/chromebooks-x86.md
This HTML page was generated by the Libreboot Static Site Generator.