Collection of appliable Mods & Tweaks (included, but not limited to libreboot).
Disclaimer
Any changes to the hardware or software listed here are usually tested (by atleast one user) and reproducible at your own reponsibility.
Some physical modifications might be UNREVERSIBLE, only replacable, keep in mind.
In case if you need any help or get another idea to include here, submit a patch on codeberg or get in contact on irc.
[Reversible] PCIe Rebar
The EDK2-based images work with modern graphics cards, which often lack VGA ROMs these days; EDK2 does GOP ROM execution.
We do not enable PCI-E relocatable BAR by default, because it caused stability issues when libgfxinit is used on Intel integrated graphics.
To enable it, do:
./mk -m coreboot TARGETEnable: Devices -> Extend resource window for PCIe devices above 4G
Enable: Devices -> Support PCIe Resizable BARs
Set that last one to the number of bits corresponding to your video RAM. Two to the power of thirty-two is 4GB; thirty-three becomes 8GB. Work it out accordingly. E.g. 16GB would be 33 bits. 39 bits is generally the maximum limit though some machines might not be stable past 36-bit.
Where only graphics cards are supported, we would enable this by default. On systems with integrated graphics, we turn it off by default.
[Reversible] Dual-GPU setup (Do not use it on processors/motherboards without integrated graphics.)
Usually used for efficient power management, but can be used to focus/accelerate task/applications too on the more powerful and usually free unit.
(Using a graphics card with 2 gpu-s on it? Feel free to skip the I. part)
I. Part, Libreboot Firmware
Libre-/Coreboot by default disables the integrated graphics on the processors if a dedicated graphics card is present.
It needs to be force enabled in the device’s menuconfig:
./mk -m coreboot *device_name_in_lbmk*Select Devices -> set Use onboard VGA as primary video device. Exit and build the rom image with -b instead of -m.
Flash the tweaked firmware and boot. Keep/connect the screen’s cable to the motherboard instead of the dedicated gpu (weird artifacts appears).
II. Part, OS
Boot into a linux distro (works with almost every distro, using systemd) and install the switcheroo-control software;
Debian based:
sudo apt install switcheroo-control -yArch based:
sudo pacman -S install switcheroo-controlFedora based:
sudo dnf install switcheroo-control -yAfter installation, enable the belonging service:
sudo systemctl enable --now switcheroo-controlDone. Defaults less resources-needy ones (desktop environment, browser, …) to the integrated/1st gpu, and more needies (video/3D editors, games, …) to the dedicated/2nd unit.
Usually with a right mouse click on the application reveals the selectable gpu-s to choose from manually. (Confirmed on Gnome,Cosmic. probably on other DE-s too.).
[Reversible] Intel 8th/9th gen. processors support on older 6th/7th gen. motherboards
Libreboot supports 4-core cpus (with B0 stepping) out of box without any mods needed, list (8th & 9th gen. desktop processors support ecc memories);
- LGA 1151; Intel 8th gen. Core with B0 stepping; i3, Pentium Gold and Celeron
- LGA 1151; 9th gen. Core with B0 stepping; i3, Pentium Gold, Celeron
But for those, interested in using 6+ core models (with U0/P0 steppings), connect the 2 pins marked on the processor in the picture (using a pencil usually enough, but a conductive slim tape is better).
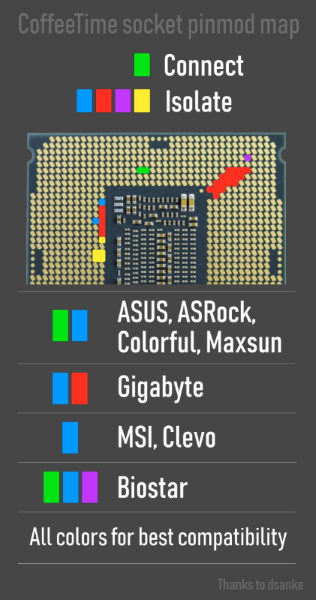
No need to isolate or cover anything, as we are using the libreboot firmware not vendor.
Dell 7010/9010/T1650, 7020/9020/XE2/T1700 (probably other dell ones too.)
[Reversible] Power On Mod for normal towers
In case any of these motherboards would be used in a different case with a 2 pin power(on) connector, connect it to the 1 (yellow/red) & 2 (Black/black) pins. (Black to black, red to yellow)
For LEDs, 3 (-/black) & 5 (+/red) (the black frame might needs to be pull carefully to reinsert it)
1 | 3 | 5 |
2 | 4 | N/A |
A guide might be here soon with pictures.
Reference here
[Partially Reversible] Chassis Mod (MT only) for bigger Cards (GPUs, Accelerators, …)
Fit a bigger GPU that exceeds the stock 10-inch length limit by removing the plastic 3.5" drive cage.
Video walktrough. (just found, not my)
A guide might be here soon with pictures.
Markdown file for this page: https://libreboot.org/extras.md
This HTML page was generated by the Libreboot Static Site Generator.