Install Libreboot on Lenovo ThinkPad X200 / X200s / X200 Tablet
English | Türkçe | українська

| Specifications | |
|---|---|
| Manufacturer | Lenovo |
| Name | ThinkPad X200/X200S/X200 Tablet |
| Released | July/September 2009 |
| Chipset | Intel Cantiga GM45 |
| CPU | Intel Core 2 Duo (Penryn family) |
| Graphics | Intel GMA X4500MHD |
| Display | 1280x800/1440x900 TFT |
| Memory | 1,2,3 or 4GB (Upgradable to 8GB, unofficially) |
| Architecture | x86_64 |
| EC | Proprietary |
| Original boot firmware | LenovoBIOS |
| Intel ME/AMD PSP | Present. Can be completly disabled. |
| Flash chip | SOIC-8/SOIC-16/WSON-8 4MiB/8MiB (Upgradable |
| to 16MiB) |
W+: Works without vendor firmware;
N: Doesn't work;
W*: Works with vendor firmware;
U: Untested;
P+: Partially works;
P*: Partially works with vendor firmware| Features | |
|---|---|
| Internal flashing with original boot firmware | N |
| Display | W+ |
| Audio | W+ |
| RAM Init | W+ |
| External output | W+ |
| Display brightness | P+ |
| Payloads supported | |
|---|---|
| GRUB | Works |
| SeaBIOS | Works |
| SeaBIOS with GRUB | Works |
Open source BIOS/UEFI firmware
This document will teach you how to install Libreboot, on your Lenovo ThinkPad X200, X200s or X200 Tablet laptop motherboard. Libreboot is a Free Software project that replaces proprietary BIOS/UEFI firmware.
It is believed that all X200 laptops are compatible. X200S and X200 Tablet will also work, depending on the configuration.
It may be possible to put an X200 motherboard in an X201 chassis, though this is currently untested by the libreboot project. The same may also apply between X200S and X201S; again, this is untested. It’s most likely true.
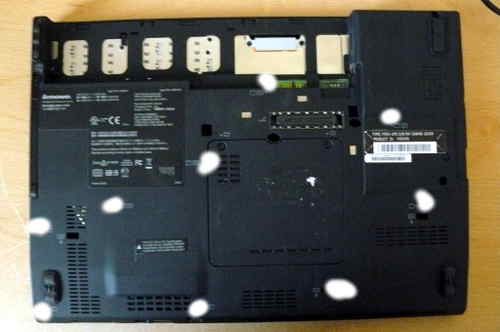
There are two possible flash chip sizes for the X200: 4MiB (32Mbit) or 8MiB (64Mbit). This can be identified by the type of flash chip below the palmrest: 4MiB is SOIC-8, 8MiB is SOIC-16.
The X200 laptops come with the ME (and sometimes AMT in addition) before flashing libreboot. libreboot disables and removes it by using a modified descriptor.
Flashing instructions can be found at ../install/#flashprog
NOTE: Libreboot standardises on flashprog now, as of 27 January 2024, which is a fork of flashrom. The reason why was explained, in the Libreboot 20240225 release
Dell Latitude E6400
If you haven’t bought an X200 yet: the Dell Latitude E6400 is much easier to flash; no disassembly required, it can be flashed entirely in software from Dell BIOS to Libreboot. It is the same hardware generation (GM45), with same CPUs, video processor, etc.
EC update
It is recommended that you update to the latest EC firmware version. The EC firmware is separate from libreboot, so we don’t actually provide that, but if you still have Lenovo BIOS then you can just run the Lenovo BIOS update utility, which will update both the BIOS and EC version. See:
- ../install/#flashprog
- http://www.thinkwiki.org/wiki/BIOS_update_without_optical_disk
- X200, X200s, X200si BIOS Update
- X200t BIOS Update
NOTE: this can only be done when you are using Lenovo BIOS. How to update the EC firmware while running libreboot is unknown. libreboot only replaces the BIOS firmware, not EC.
Updated EC firmware has several advantages e.g. better battery handling.
LCD compatibility list
LCD panel list (X200 panels listed there): http://www.thinkwiki.org/wiki/TFT_display
All LCD panels for the X200, X200S and X200 Tablet are known to work.
AFFS/IPS panels
X200
Adapted from https://github.com/bibanon/Coreboot-ThinkPads/wiki/ThinkPad-X200
Look at wikipedia for difference between TN and IPS panels. IPS have much better colour/contrast than a regular TN, and will typically have good viewing angles.
These seem to be from the X200 tablet. You need to find one without the glass touchscreen protection on it (might be able to remove it, though). It also must not have a digitizer on it (again, might be possible to just simply remove the digitizer).
BOE-Hydis HV121WX4-120, HV121WX4-110 or HV121WX4-100 - cheap-ish, might be hard to find
Samsung LTN121AP02-001 - common to find, cheap
If your X200 has an LED backlit panel in it, then you also need to get an inverter and harness cable that is compatible with the CCFL panels. To see which panel type you have, see #led_howtotell. If you need the inverter/cable, here are part numbers: 44C9909 for CCFL LVDS cable with bluetooth and camera connections, and 42W8009 or 42W8010 for the inverter.
There are glossy and matte versions of these. Matte means anti-glare, which is what you want (in this authors opinion).
Refer to the HMM (hardware maintenance manual) for how to replace the screen.
Sources:
- ThinkPad Forums - Matte AFFS Panel on X200
- ThinkPad Forums - Parts for X200 AFFS Mod
- ThinkWiki.de - X200 Displayumbau
X200S
http://forum.thinkpads.com/viewtopic.php?p=618928#p618928 explains that the X200S screens/assemblies are thinner. You need to replace the whole lid with one from a normal X200/X201.
How to tell if it has an LED or CCFL?
Some X200s have a CCFL backlight and some have an LED backlight, in their LCD panel. This also means that the inverters will vary, so you must be careful if ever replacing either the panel and/or inverter. (a CCFL inverter is high-voltage and will destroy an LED backlit panel).
CCFLs contain mercury. An X200 with a CCFL backlight will (unless it has been changed to an LED, with the correct inverter. Check with your supplier!) say the following: “This product contains Lithium Ion Battery, Lithium Battery and a lamp which contains mercury; dispose according to local, state or federal laws” (one with an LED backlit panel will say something different).
Installation notes
External flashing required, if running Lenovo BIOS.
This guide is for those who want libreboot on their ThinkPad X200 while they still have the original Lenovo BIOS present. This guide can also be followed (adapted) if you brick your X200, to know how to recover.
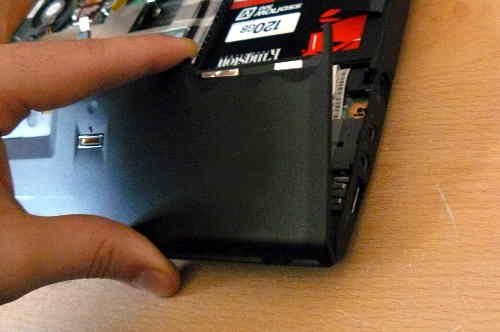
If you have the original Lenovo firmware running, you will need to take the keyboard and palmrest off so that you can access the flash chip, which is just underneath the palm rest. You will then connect an external SPI programmer, to re-flash the chip externally while it is powered off with the battery removed.
NOTE: This guide only applies to the regular X200. For X200S and X200 Tablet flashing, please read other guides available on libreboot.org.
Flash chip size
Run this command on x200 to find out flash chip model and its size:
flashprog -p internalMAC address
Refer to mac_address.html.
The procedure
This section is for the X200. This does not apply to the X200S or X200 Tablet (for those systems, you have to remove the motherboard completely, since the flash chip is on the other side of the board).
Remove these screws:
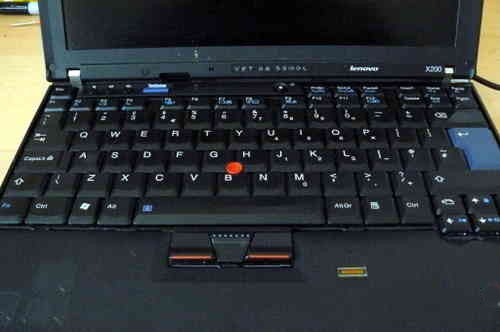
Gently push the keyboard towards the screen, then lift it off, and optionally disconnect it from the board:
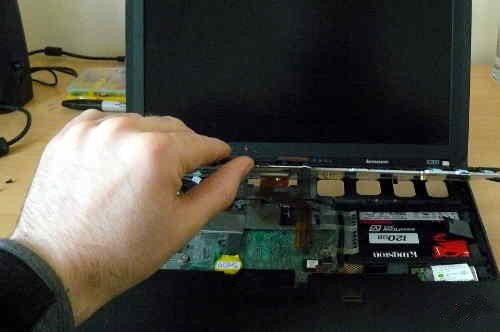
Disconnect the cable of the fingerpring reader, and then pull up the palm rest, lifting up the left and right side of it:
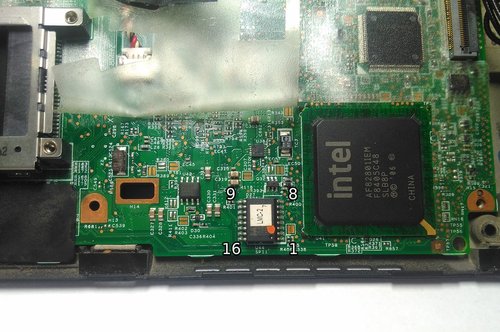
This shows the location of the flash chip, for both SOIC-8 and SOIC-16:

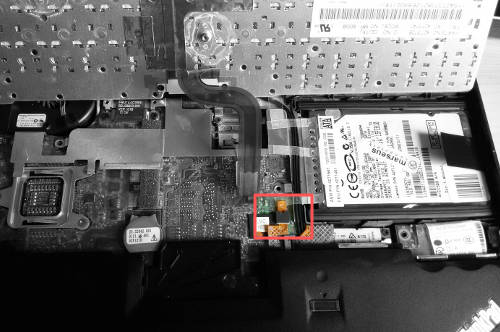
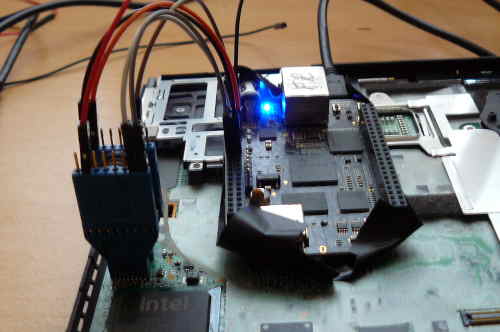
Lift back the tape that covers a part of the flash chip, and then connect the clip:
Now, you should be ready to install libreboot.
Refer to the SPI programming instructions.
When you’re done, put the system back together. If it doesn’t boot, try other RAM modules because raminit is very unreliable on this platform (in coreboot).
Memory
In DDR3 machines with Cantiga (GM45/GS45/PM45), northbridge requires sticks that will work as PC3-8500 (faster PC3/PC3L sticks can work as PC3-8500). Non-matching pairs may not work. Single module (meaning, one of the slots will be empty) will currently only work in slot 0.
NOTE: according to users reports, non matching pairs (e.g. 1+2 GiB) might work in some cases.
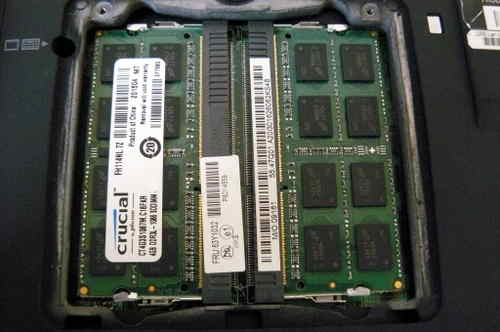
Make sure that the RAM you buy is the 2Rx8 configuration when buying 4GiB sticks (In other words: maximum of 2GiB per rank, 2 ranks per card).
In this photo, 8GiB of RAM (2x4GiB) is installed:
Boot it!
You should see something like this:
Now install Linux.
Errata
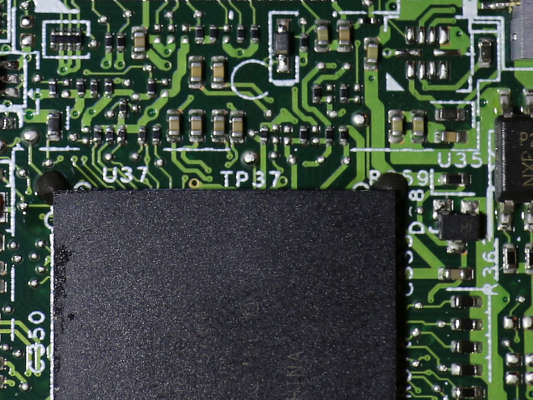
X200S and X200 Tablet users: GPIO33 trick will not work.
sgsit found out about a pin called GPIO33, which can be grounded to disable the flashing protections by the descriptor and stop the ME from starting (which itself interferes with flashing attempts). The theory was proven correct; however, it is still useless in practice.
Look just above the 7 in TP37 (that’s GPIO33):
By default we would see this in lenovobios, when trying flashprog -p internal -w rom.rom:
FREG0: Warning: Flash Descriptor region (0x00000000-0x00000fff) is read-only.
FREG2: Warning: Management Engine region (0x00001000-0x005f5fff) is locked.
With GPIO33 grounded during boot, this disabled the flash protections as set by descriptor, and stopped the ME from starting. The output changed to:
The Flash Descriptor Override Strap-Pin is set. Restrictions implied by
the Master Section of the flash descriptor are NOT in effect. Please note
that Protected Range (PR) restrictions still apply.
The part in bold is what got us. This was still observed:
PR0: Warning: 0x007e0000-0x01ffffff is read-only.
PR4: Warning: 0x005f8000-0x005fffff is locked.
It is actually possible to disable these protections. Lenovobios does, when updating the BIOS (proprietary one). One possible way to go about this would be to debug the BIOS update utility from Lenovo, to find out how it’s disabling these protections. Some more research is available here: http://www.coreboot.org/Board:lenovo/x200/internal_flashing_research
Of course, it’s likely that the Lenovo BIOS is checking for some bit in memory that tells it not to disable flashing, and then it won’t set PRx registers. The way the Lenovo BIOS updater works is, it is executed in Windows first and then a reboot happens, triggering the re-flashing to happen during early boot. It is probably setting something in memory and loading the ROM, plus a payload program that does the flashing; Lenovo BIOS then probably sees that and runs that, instead of setting PRx and going for normal boot. It is theoretically possible that we could discover how this works, by debugging the Lenovo BIOS update utility (in Windows), and then replicate what it is doing, with some tool for Linux, then load a flashprog binary into memory and the ROM to flash (for the BIOS region). You would do this with GPIO33 grounded, and the payload program would actually flash the entire chip, with just a normal libreboot image.
It’s possible. The above is likely the only way that the Lenovo BIOS updater program works. So if we discover precisely how to do that, then you could just connect some pogo pins to ground GPIO33, then boot up, run some software (which would have to be written) that does the above.
On a related note, libreboot has a utility that could help with investigating this: ich9utils.html#demefactory
The Canoeboot version of this page is: https://canoeboot.org/docs/install/x200.html
Markdown file for this page: https://libreboot.org/docs/install/x200.md
This HTML page was generated by the Libreboot Static Site Generator.