Install Libreboot on Gigabyte GA-G41M-ES2L
!!BACKUP everything!! just in case something fails.
| Specifications | |
|---|---|
| Manufacturer | Gigabyte |
| Name | GA-G41M-ES2L |
| Released | 2009 |
| Chipset | G41 |
| CPU | LGA775, Core 2 (Duo+Quad) |
| Graphics | GMA X4500 |
| Memory | DDR2 SODIMMs max. 8GB (2 x 4GB) |
| Architecture | x86_64 |
| Original boot firmware | AWARD BIOS |
| Intel ME/AMD PSP | Present, Fully removable |
| Flash chip | SOIC-8 2x 1MB/8Mbit SST25VF080B (Dual-BIOS) |
W+: Works without vendor firmware;
N: Doesn't work;
W*: Works with vendor firmware;
U: Untested;
P+: Partially works;
P*: Partially works with vendor firmware| Features | |
|---|---|
| Internal flashing with original boot firmware | W+ |
| Display | W+ |
| Audio | W+ |
| RAM Init | P+ |
| External output | W+ |
| Payloads supported | |
|---|---|
| GRUB | Slow! |
| SeaBIOS | Works |
| SeaBIOS with GRUB | Works |
Get the ROM image
Download from release
Build from source
The build target, when building from source, is thus:
./mk -b coreboot ga_g41m_es2lFlash a ROM image
Software
Before internal flashing, Disable /dev/mem protection first.
In short add this kernel parameter: iomem=relaxed(linux distro)/kernel.securelevel=-1(bsd distro)
THEN REMOVE THIS KERNEL PARAMETER TO PREVENT UNAUTHORIZED/MALICIOUS ACCESS TO YOUR SYSTEM AFTER FLASHING LIBREBOOT.
(An important reminder for those who might forget to delete it, even better, replace it with lockdown=integrity / lockdown=confidentiality)
Backup the previous (working) firmware (atleast) twice (to check and compare if reading it gone wrong and backups differs.)
flashprog -p internal:dualbiosindex=0 -r Backup1.bin

flashprog -p internal:dualbiosindex=0 -r Backup2.bin
Check and compare those if reading from the flash were successful:
diff Backup1.bin Backup2.binFor more than 2:
shasum Backup1.bin Backup2.bin Backup3.binIf those differs, something gone wrong and proceeding further may (DON’T) leave your device unrecoverable (without a reliable backup) if flashing fails as well.
There are 2 flash chips (one is backup).
Flash the first chip:
./flashprog -p internal:dualbiosindex=0 -w libreboot.romFlash the second chip:
./flashprog -p internal:dualbiosindex=1 -w libreboot.romWarning: If you don’t flash both chips, the recovery program from the default factory BIOS will kick in and your board will be soft bricked. Make sure that you flash both chips!
Otherwise you can still boot the system with just the main flash chip connected, after desoldering the backup chip. This has been tested while libreboot was already installed onto the main chip.
Hardware
Refer to spi.html for how to set up an SPI programmer for external flashing. You can only externally reprogram one of the chips at a time, and you need to disable the chip that you’re not flashing, by connecting 3v3 to /CS of that chip, so you will actually need second test clip or IC pin mini grabber.
The flash shares a common voltage plane with the southbridge, which draws a lot of current. This will cause under-voltage on most SPI flashers, so do not use the 3.3V rail from your flasher. Do not connect +3.3V to the chip. Instead, turn the board on and then turn it off by holding the power button. With the board powered down, but plugged in, there will be a 3.3V supply from the ATX PSU. You can then flash, but DO NOT connect the +3.3V supply from your SPI flasher!
NOTE: You should use a resistor in series, between 1K to 10K ohms, for the 3.3v connection to the CS pin. This is to protect from over-current.
Here is an image of the flash chip:
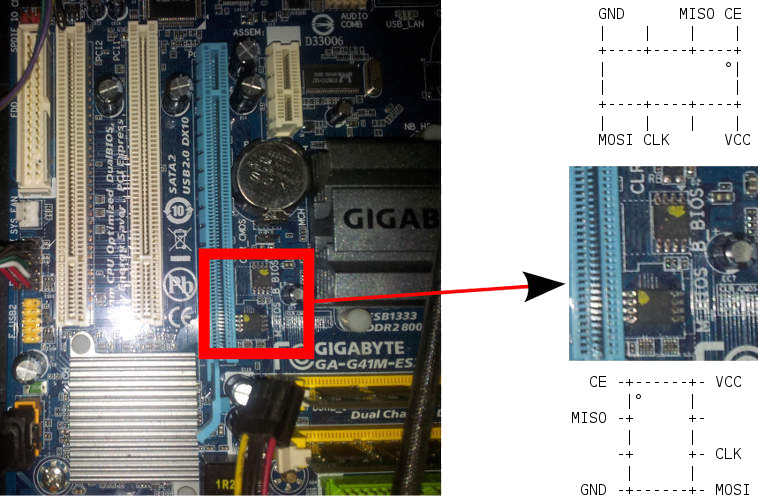
Backup the previous (working) firmware twice (to check and compare if reading it gone wrong and backups differs.)
flashprog -p serprog:dev=/dev/ttyACM0,spispeed=16M -r Backup1.bin

flashprog -p serprog:dev=/dev/ttyACM0,spispeed=16M -r Backup2.bin
Check and compare those if reading from the flash were successful:
diff Backup1.bin Backup2.binFor more than 2:
shasum Backup1.bin Backup2.bin Backup3.binIf those differs, something gone wrong and proceeding further may (DON’T) leave your device unrecoverable (without a reliable backup) if flashing fails as well.
Networking (might be Outdated)
Due to a bug in the hardware, the MAC address is hardcoded in coreboot. Therefore, you must set your own MAC address in your operating system.
Use macchanger in your distro, to set a valid MAC address. By doing this, your NIC should work nicely. In /etc/network/interfaces on debian-based systems like Debian or Devuan, this would be in the entry for your NIC:
hwaddress ether macaddressgoeshere
Alternatively:
cbfstool libreboot.rom extract -n rt8168-macaddress -f rt8168-macaddressModify the MAC address in the file rt8168-macaddress and then:
cbfstool libreboot.rom remove -n rt8168-macaddress
cbfstool libreboot.rom add -f rt8168-macaddress -n rt8168-macaddress -t raw
Now you have a different MAC address hardcoded. In the above example, the ROM image is named libreboot.rom for your board. You can find cbfstool under cbutils/ after running the following command in the build system:
./mk -d coreboot TREENAMEYou can learn more about using the build system, lbmk, here:
libreboot build instructions
Memory Modules (might be Outdated)
[link]This board is very picky with RAM. If it doesn’t boot, try an EHCI debug dongle, serial usb adapter and null modem cable, or spkmodem, to get a coreboot log to see if it passed raminit.
Kingston 8 GiB Kit KVR800D2N6/8G with Elpida Chips E2108ABSE-8G-E
this is a 2x4GB setup and these work quite well, according to a user on IRC.
Nanya NT2GT64U8HD0BY-AD with 2 GiB of NT5TU128M8DE-AD chips works too.
Many other modules will probably work just fine, but raminit is very picky on this board. Your mileage will fluctuate, wildly.
Removed GRUB (might be Outdated)
As of Libreboot release 20221214, only SeaBIOS payload is provided in ROMs for this board. According to user reports, they work quite well. GRUB was always buggy on this board, so it was removed from lbmk.
SATA in IDE emulation (might be Outdated)
IDE on the board is untested, but it might be possible to use a SATA HDD using an IDE SATA adapter. The SATA ports do work, but it’s IDE emulation. The emulation is slow in DMA mode sia SeaBIOS, so SeaBIOS is configured to use PIO mode on this board. This SeaBIOS configuration does not affect the Linux kernel.
Fan control issue (might be Outdated)
PWM fan speed is not changing in depend of CPU temperature based on SuperIO fan control
Expanded_Specifications
The Canoeboot version of this page is: https://canoeboot.org/docs/install/ga-g41m-es2l.html
Markdown file for this page: https://libreboot.org/docs/install/ga-g41m-es2l.md
This HTML page was generated by the Libreboot Static Site Generator.