---
title: Install Libreboot on Dell OptiPlex 3050 Micro
x-toc-enable: true
...

**[PLEASE READ THESE INSTRUCTIONS BEFORE INSTALLING](ivy_has_common.md), OR
YOU MAY BRICK YOUR MACHINE!! - Please click the link and follow the instructions
there, before flashing. For posterity,
[here is the link again](ivy_has_common.md).**

<div class="specs">
<center>
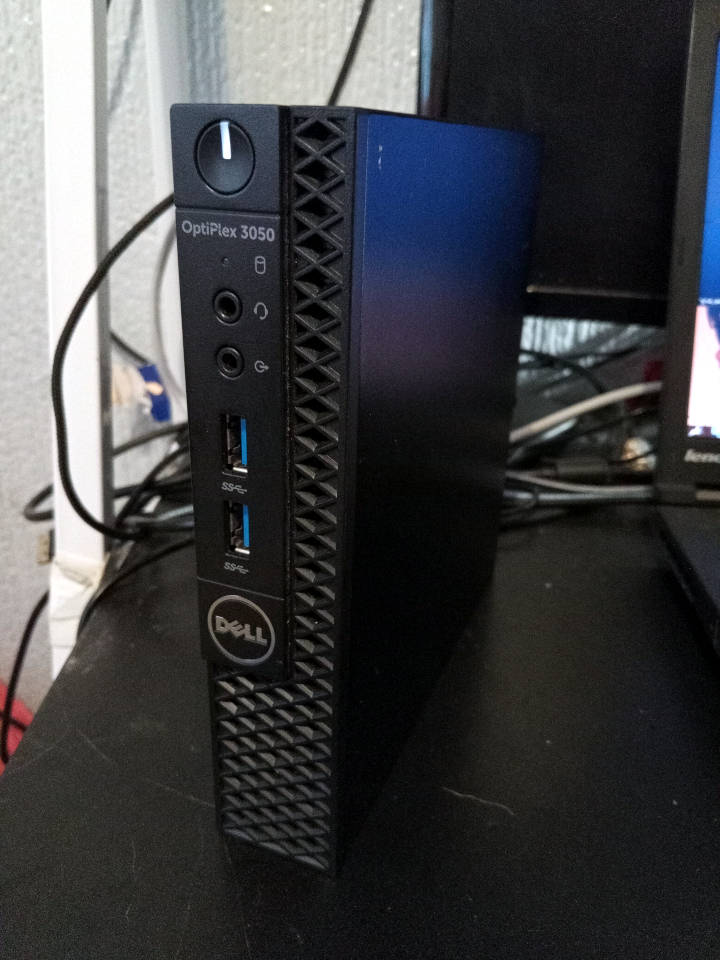
<img tabindex=1 alt="Dell OptiPlex 3050 Micro" class="p" src="https://av.libreboot.org/3050micro/3050micro.jpg" /><span class="f"><img src="https://av.libreboot.org/3050micro/3050micro.jpg" /></span>
</center>

| ***Specifications***       |                                                |
|----------------------------|------------------------------------------------|
| **Manufacturer**           | Dell                                           |
| **Name**                   | OptiPlex 3050 Micro                                |
| **Variants**               | OptiPlex 3050 Micro                                |
| **Released**               | 2017                                           |
| **Chipset**                | Intel Kaby Lake                                     |
| **CPU**                    | Intel Skylake/Kaby Lake                    |
| **Graphics**               | Intel HD graphics |
| **Memory**                 | DDR4 SODIMMs (max 32GB, 2x16GB)    |
| **Architecture**           | x86\_64                                         |
| **Original boot firmware** | Dell UEFI firmware                             |
| **Intel ME/AMD PSP**       | Present. Can be disabled with me\_cleaner.      |
| **Flash chip**             | SOIC-8 16MiB (128Mbit)           |


```
W+: Works without vendor firmware; 
N: Doesn't work; 
W*: Works with vendor firmware; 
U: Untested; 
P+: Partially works; 
P*: Partially works with vendor firmware
?: UNKNOWN AT THIS TIME
```

| ***Features***                                    |    |
|---------------------------------------------------|----|
| **Internal flashing with original boot firmware** | W* |
| **Display (if Intel GPU)**                        | W+ |
| **Audio**                                         | W+ |
| **RAM Init**                                      | W* |

| ***Payloads supported***   |           |
|----------------------------|-----------|
| **GRUB (libgfxinit only)** | Works     |
| **SeaBIOS**                | Works     |
</div>

Open source BIOS/UEFI firmware
-------------------------

This document will teach you how to install Libreboot, on your
Dell OptiPlex 3050 Micro desktop motherboard.
Libreboot is a [Free Software](https://writefreesoftware.org/learn) project
that replaces proprietary BIOS/UEFI firmware.

**Unavailable in Libreboot 20240612 or earlier. You must [compile from
source](../build/), or use a version newer than Libreboot 20240612.**

### Buy pre-installed

**Dell OptiPlex 3050 Micro is available to purchase with Libreboot preinstalled.
See: <https://minifree.org/product/libreboot-3050-micro/>**
Official information about the computer can be found here:
<https://www.dell.com/support/manuals/en-uk/optiplex-3050-micro/optiplex_3050-mff_om/processor-specifications?guid=guid-8ca53ab2-a85d-42d5-9106-5214220306aa&lang=en-us>

### Warning regarding NVMe SSDs

Please use at least Libreboot
20241206 *[revision 3](../../news/libreboot20241206.Revisions.md#revision-3-11-december-2024)*
or higher. This is because older revisions contained a bug, where the NVMe
SSD would be *replugged* under Linux, randomly, leading to data loss.

This is fixed in 20241206 rev3 or higher, by disabling PCI-E hotplug on the
NVMe SSD slot.

See: [Libreboot 20241206 release](../../news/libreboot20241206.md)

### Build ROM image from source

The build target, when building from source, is thus:

	./mk -b coreboot dell3050micro_vfsp_16mb

Mate Kukri's *deguard* utility disables the Intel Boot Guard on this
machine. Libreboot uses this by default, along with `me_cleaner` to provide
a neutered ME setup; unlike on other platforms, arbitrary code execution is also
possible inside the ME on this motherboard, giving it much higher potential for
software freedom in the future.

Coffee Lake CPU support
-----------------------

8th/9th generation (Coffee Lake/Coffee Lake Refresh) quad core CPUs
likely do work on this board using libreboot, with no modifications
required. i3-9300t has been confirmed to work on this board with libreboot
without any modifications.

There is a pin mod to allow 6/8 core Coffee Lake CPUs to be used, but
it doesn't work on this board. It is not currently known whether this
is a software limitation that could be fixed in a future release, or a
hardware limitation.

### i3-9100t

The i3-9100t is cheap, and easy to find.

Regarding stepping: B0 stepping is assumed. U0 stepping is untested, and it is
assumed that you need the pin mod to be able to use this.

At present, we only know that the quad-core 9th gen processors work, e.g.
i3-9100t.

Note that the T version is for 3050micro, but Libreboot will be adding non-micro
optiplexes of 6th/7th gen (MEv11 machines) likely in the Libreboot 26.06 release
expected for June 2026. On the higher wattage machines, e.g. OptiPlex 5050 SFF,
there are models like the i3-9100 (non-T version) which should work.

### Pin mod

Not properly tested yet, but see:

* <https://winraid.level1techs.com/t/guide-coffeelake-cpus-on-skylake-kabylake-mainboards/32344>
* <https://hackaday.com/2024/05/31/intels-anti-upgrade-tricks-defeated-with-kapton-tape/>

You could theoretically use 6-core CPUs for example. Without the mod, only
quad-core CPUs are supported. It is not known whether this mod would actually
work on the 3050 micro.

If it does work, this mod is useful because newer generation optiplexes have
a newer version of Intel ME, where it is not yet known how to disable the
Intel Boot Guard. Retrofitting newer CPUs onto these older boards is a good way
to modernise them somewhat.

NOTE: the `MAINBOARD_SUPPORTS_COFFEELAKE_CPU` option must be enabled in
coreboot menuconfig, for those CPUs to work. This also means that the microcode
will be loaded properly. This is currently enabled by default, on 3050micro.

Please also see:

<https://review.coreboot.org/c/coreboot/+/90588/2/src/mainboard/dell/sklkbl_desktops/Kconfig#16>

This coreboot gerrit note says to modify the IFD accordingly, when using the
higher core CPU models.

It is believed that all 9100/9100T will have B0 stepping, but this is not
guaranteed. Some may have different stepping. Please make sure you know what
stepping your CPU has when doing any of this.

Issues
------

This machine basically works flawlessly, as of the Libreboot 20241206 release.
All the initial bugs were fixed, e.g. PWM fan control works now. A very nice
machine, and inexpensive, plus very easy to set up for the average user. The
ideal Libreboot desktop.

Note that HDMI audio *does* work, but you have to select it in your audio
server e.g. pipewire. The `pavucontrol` utility in Linux (with pipewire) lets
you have a lot of control over audio I/O. Libreboot patches the board to add
a verb, so headphones should work.

Selection of audio devices and outputs is a bit idiosyncratic on this board.
Just play with pavucontrol for your setup and it should work fine.

### VGA output

All 3050 Micros have one Displayport and one HDMI output. These work very well,
but a few models have a VGA output via add-on board.

The VGA output is actually a digital to analog converter internally, on an
expansion board mounted to the rear chassis. In testing, this worked fine with
the Libreboot payloads e.g. SeaBIOS and GRUB, but then Linux wouldn't show any
output to the screen.

This should be investigated/fixed, but for now, you might use your own
digital to analog converter. For example, Displayport to VGA converters are
very cheap and easy to find.

Linux can be hit or miss with these adapters, as can libgfxinit (when showing
payloads), so you just have to try a bunch of adapters until one works.

The onboard DisplayPort and HDMI outputs work fine. It's just the VGA port that
can be a bit flaky depending on your operating system.

Installation
------------

### Insert binary files

If you're using a release ROM, please ensure that you've inserted extra firmware
required refer to the [guide](../install/ivy_has_common.md) for that. (failure
to adhere to this advice will result in a bricked machine)

Libreboot's build system automatically downloads and processes these files if
you build Libreboot from source, but the same logic that it uses must be re-run
if you're using a release image.

Of particular interest, this board uses the [deguard](deguard.md) software,
to disable Intel Boot Guard. This means also that the ME firmware no longer
has functional cryptographic signature checking for most of it; you can
theoretically run whatever you want on the ME coprocessor.

Libre ME doesn't exist yet, but it's now possible. Example use-case for a
libre ME could include, for example, running an out-of-bound packet filter
on a secure network (with flash write protection, making it invincible to any
OS-based software attacks).

### MAC address

This has a Realtek NIC inside, instead of Intel, so the MAC address will not
change. This means: there is no GbE region in the flash.

You can still use something like `macchanger` to change your MAC address
from Linux if you want to.

This is great, because that's one less complexity to deal with during
installation.

### Flash a ROM image (software)

If you're already running Libreboot, and you don't have flash protection
turned on, [internal flashing](../install/) is possible.

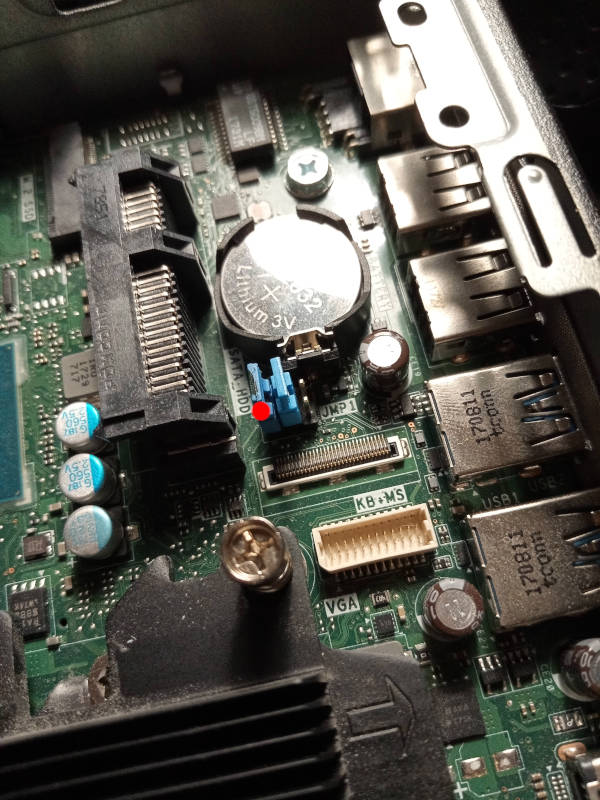
<img tabindex=1 alt="Dell OptiPlex 3050 Micro service jumper" class="p" src="https://av.libreboot.org/3050micro/fdo.jpg" /><span class="f"><img src="https://av.libreboot.org/3050micro/fdo.jpg" /></span>

If you have factory firmware (Dell), you can short the service jumper. It's
near the RAM, under where the HDD goes (click the photos shown above).
Just put a short on it when booting,
and all flash protection is disabled; the factory firmware write might EFI
variables to flash during shutdown sequence, so you should *pull the plug* to
shut it down (remove the power by pulling the plug) after flashprog
says `VERIFIED`.

### Flash a ROM image (hardware)

For general information, please refer to [25xx NOR flash
instructions](../install/spi.md) - that page refers to use of socketed flash.

The side cover comes off easily, and you can find the flash ICs next to the RAM.
Simply remove the screw at the back. The top panel then slides forward, and you
can remove the SSD caddy; from then on, the flash is accessible.

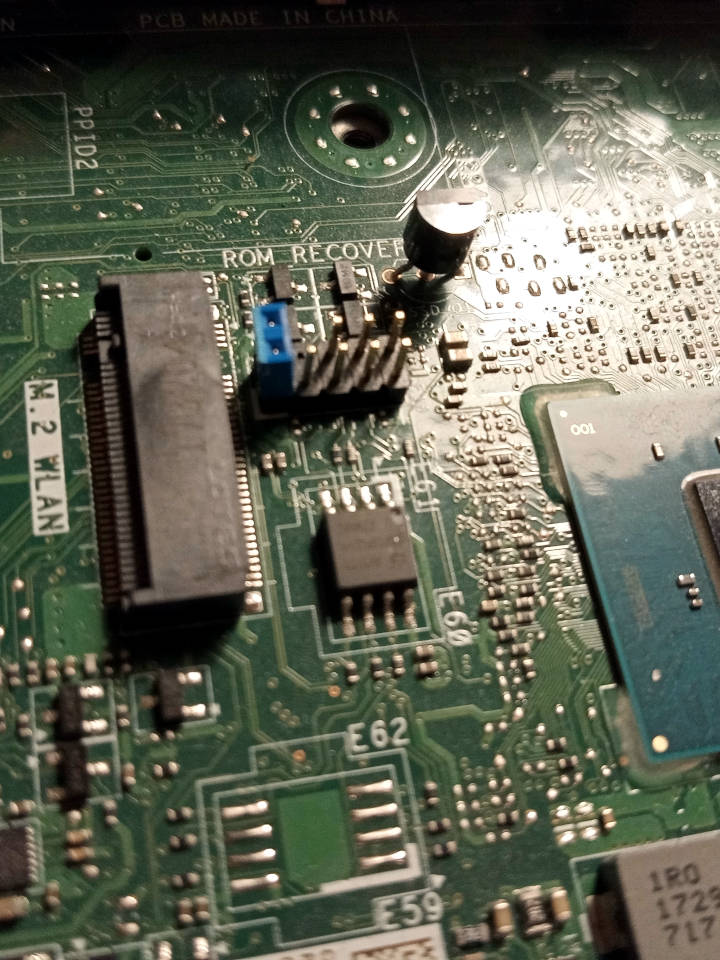
Observe the following photo of the flash (SOIC-8):

<img tabindex=1 alt="Dell OptiPlex 3050 Micro flash IC" class="p" src="https://av.libreboot.org/3050micro/flash.jpg" /><span class="f"><img src="https://av.libreboot.org/3050micro/flash.jpg" /></span>

You can otherwise flash internally, including from factory firmware (if the
service jumper is set).

Errata
------

### Power-on after power failure

Older Libreboot revisions made this machine always turn on, when plugging in
a power supply (charger brick), if a previous power loss was observed. This is
because coreboot sets a special register in the PMC that configures such
behaviour, but it was hardcoded to always-on. This is undesirable for most
people, so Libreboot 20241206 *revision 8* and newer releases contain the
following modification:

<https://browse.libreboot.org/lbmk.git/commit/?id=09a01477df67e3ddc36e11123c537332d7813c50>

If you wish to modify this behaviour again, you could modify the patch
referenced there; the actual location of the `.patch` file may change over
time, so you can basically just modify the coreboot source file
at `src/soc/intel/common/block/pmc/pmclib.c` (for the coreboot tree
under `src/coreboot/` in lbmk, pertaining to your board, which can be determined
by reading the `tree` variable in your board's `target.cfg` file within lbmk).

Use the patch as reference, to modify the coreboot behaviour as you wish, and
re-compile [from source](../build/).

### TPM disabled

The TPM is disabled on this device, to prevent hanging/boot delay in SeaBIOS,
due to buggy TPM drivers there.

### Legacy 8254 timer

Legacy 8254 timer enabled in coreboot, to prevent SeaBIOS from hanging.

### HyperThreading on 3050 Micro

NOTE: The 3050 Micro is available in different CPU configurations.
Before considering to enable HyperThreading support, make sure it is
supported by the CPU of your 3050 Micro.

Also called SMT. This is a feature where you get 2 threads on a single core.
It can improve performance in some workloads, but is actually a performance
liability in others, depending on your OS kernel/scheduler and the actual
workload.

It is a security liability, due to the Spectre/Meltdown attacks, so we
recommend turning it off, at the very least from your running operating system.
On *this* platform, you can easily turn it off from coreboot.

**Libreboot disables HyperThreading by default**, from Libreboot 20241206 rev8
onward, on this board. To turn it back on, please [build from source](../build/)
and before running the build command, do this:

	./mk -m coreboot dell3050micro_vfsp_16mb

In the menu that appears, go *Chipset -> Enable Hyper-Threading* and turn it on.
Then exit from the menu, saving the config where prompted. You will see this
menu twice, because there are *two* configs for each of these boards.

SMT is rarely of benefit in practice, but can be useful in some circumstances.
For example, if you're compiling a large codebase from source that takes hours,
SMT increases the building speed by about 15 percent; for example, a 3 hour
build job might take about 2 hours and 40 minutes instead.


[//]: # "SPDX-License-Identifier: GFDL-1.3-or-later"